Showing posts with label recipe. Show all posts

Tuesday, 22 October 2013

super moist chocolate cake

Super Moist Chocolate Cake

So I'm getting into this baking lark. I like the philosophy behind it all too; a bit of prep, mix stuff together, throw it in the oven, sit back and wait for the thing to cook itself. Hmmm, that might not be exactly how it is in reality it seems...

Arguably easier than making a tart for dessert (no pastry, no blind baking, all that malarkey) I decided to try and perfect the humble chocolate cake. What could be simpler thinks I? Well, very recent experience tells me many things could be simpler actually.

I did make a few chocolate sponge cakes when testing this out, and all of them were pretty much edible. The problem I had was that they weren't perfect. Sinking, cracking, refusal to set, refusal to leave the tin; these have been some of the problems I've faced over the last couple of weeks. The biggest issue I've had however is getting the thing moist enough. I'm glad to report I've fixed this though!

Follow this recipe and you'll get a fantastically moist and tasty chocolate cake every single time; really straightforward too (I think?!). And thank goodness for that...


Ingredients

  • 250g self-raising flour
  • ½ tsp bicarbonate of soda
  • 3 tbsp cocoa powder
  • 300g caster sugar
  • 2 medium eggs, beaten
  • 1 tsp vanilla extract
  • 250g butter
  • 200ml cola
  • 220ml full-fat milk


Method
  1. Preheat the oven to 180c / 160c (fan) / gas mark 4. Grease a 24cm deep cake tin with butter or a light coating of sunflower oil and line it with greaseproof paper.
  2. Sift the flour, bicarbonate of soda and cocoa powder into a large mixing bowl.
  3. Add the eggs, sugar and vanilla extract and beat well with an electric mixer.
  4. Melt the butter in a saucepan over a low to medium heat. Stir the cola into the butter then stir in the milk. Remove from the heat and leave to cool slightly for 2 or 3 minutes.
  5. Gently whisk the wet mixture into the dry ingredients and pour into your greased tin.
  6. Bake for around 40 minutes, until a skewer or small sharp knife comes out clean when inserted into the centre.
  7. Remove from the oven and cool in the tin for 10-15 minutes. Carefully remove the cake from the tin , remove the greaseproof paper.
  8. Stand back in amazement, dive in. And remember to come up for air every now and again. Oh and if you can bear it, share the thing; that's a lot of cake for one person and you can win some serious brownie points with this one...


    Monday, 7 October 2013

    simple soda bread

    Simple soda bread

    I cook. That's what I do. Usually savoury recipes, usually starters & mains, occasionally a dessert or two. Baking has always evaded me; or more accurately, I've always evaded baking! The fear of the unknown I guess? Don't get me wrong, I can make a decent bit of shortcrust pastry for a fantastic lemon tart (recipe to follow!), but bread has always been something I've bought rather than made. Time for that to change!

    So here we go, head first into the world of bread making. We're starting with arguably the simplest of all: soda bread. No yeast, no kneading, no proving, no knocking back; in fact not much of anything, and ready to eat from start to finish in less than an hour - my kind of bread recipe indeed!

    Thanks to Easy Food Magazine for this recipe from their latest issue!


    Ingredients
    • 500g plain flour
    • 400ml buttermilk
    • 2 tsp bicarbonate of soda
    • 1 tsp salt


    Method
    1. Pre-heat the oven to 200c / 180c (fan) / gas mark 6.
    2. Sift the flour, bicarbonate of soda and salt into a large mixing bowl.
    3. Make a well in the middle and pour i the buttermilk.
    4. Mix gently together with your hands until well combined.
    5. Lightly flour a large surface and plonk the mixture onto it. Knead for 30-60 seconds, just to bring it together, and form into a round shape.
    6. Place the bread onto a lightly floured baking sheet (or alternatively line with a piece of baking parchment) and place the bread in the middle.
    7. Flour the blade of a knife and cut a cross across the top of the bread, around 2cm deep.
    8. Place in the middle of the pre-heated oven and bake for around 45 minutes.
    9. Check the bread is cooked by tapping the bottom of the loaf - it should sound hollow. If it does, it's done.
    10. Hey presto; you've just made bread.


      Monday, 30 September 2013

      pan-seared pigeon breast with roast apples, black pudding & cider reduction

      Pan-seared pigeon breast with roast apples, black pudding & cider reduction


      Game season is under way again in Ireland and butchers are now starting to stock all of those richer meats we see in the Autumn & Winter months. Venison is back in town, as is pheasant, wild boar, partridge, quail... This dish uses pigeon; a lovely dark rich meat with virtually no fat, and cheap too; the 4 breasts I used here only set me back around €8!

      This is a great starter, packed with flavour and leaving you wanting more every time!


      Ingredients


      • 4 pigeon breasts
      • 100g black pudding, diced
      • 1 Granny Smith apple, cored, peeled & cut into 8
      • 200ml dry cider
      • 2 tbsp duck fat
      • 20g butter
      • Salt & pepper


      Method
      1. Pre-heat the oven to 180c / 160c (fan) / gas mark 4.
      2. Heat a non-stick frying pan over a medium high heat and add 1tbsp duck fat and the butter.
      3. Season the apple pieces with salt & pepper & fry for 1 minute on each side until just starting to colour slightly.
      4. Transfer the apple to a non-stick baking tray and place in the oven. Cook for 10 minutes.
      5. Meanwhile, add the other half of the duck fat into the frying pan and fry the black pudding for 3 or 4 minutes. Drain on kitchen paper then place on a second baking tray and place in the oven for 7-8 minutes.
      6. Season the pigeon breasts on both sides & fry for 1 minute, skin side down. Turn over, add the cider and cook for another 2 minutes.
      7. Remove the breasts from the pan and set aside to rest.
      8. Turn the heat up in the pan and reduce the cider by around half.
      9. To serve, place the apple pieces in a bowl or on a plate of your choice. Slice the pigeon breasts into 5 or 6 pieces each and place on top of the apple. Sprinkle the black pudding over and spoon over the sauce.
      10. I also finished mine off with some posh micro herbs; in this case it was red stem radish, but pea shoots would be lovely too.
      11. Enjoy!


      Serves 2

      Tuesday, 24 September 2013

      pan-fried squid & chorizo with heritage tomato & feta salad

      Pan-fried squid & chorizo with heritage tomato & feta salad

      Here's a healthy Mediterranean type option for those of you who, like me, still wish they were on holiday having long lazy lunches somewhere hot and sunny without too much of a care in the world...

      This light dish started off life as a 'let's-see-what-we've-got-left-in-the-fridge' plate of food, when I fancied a starter to pre-empt the chicken dish I was cooking as my main course. The resulting meal was VERY tasty, so of course I had to share! As you can see from the photo, it looks great too; really vibrant with loads of colour, and of course the flavours are just beautiful together.

      Quick to prepare, and even quicker to cook and plate up, leaving you plenty of time to slow down and enjoy with a large slurp or two of cold dry white wine...


      Ingredients

      For the squid
      • 2 x squid (tubes/bodies only), cleaned, halved along each side and cut into thin strips widthways
      • 1 x chorizo sausage, diced (I used Gubbeen chorizo from Cork, keeping it local!)
      • Olive oil
      • Squeeze of fresh lemon juice
      • Salt & pepper

      For the tomato salad
      • 2oog (approx - I used 2 - 3 good handfuls) Heritage (a.k.a. Heirloom) tomatoes, sliced
      • 80g feta cheese, diced
      • Good handful of freshly chopped parsley
      • 1 clove of garlic, finely sliced
      • 2 tbsp extra virgin olive oil
      • Squeeze of fresh lemon juice
      • Salt & pepper


      Method
      1. First make the salad. Throw everything into a bowl and season to taste with the lemon juice, salt & pepper. Leave to one side for the flavours to combine a little.
      2. Heat a non-stick frying pan over a medium-high heat and add the chorizo. Cook for 4 or 5 minutes until the sausage starts to colour and release some of its oils.Remove from the pan and drain on kitchen paper.
      3. In the same pan, add a small splash of olive oil and throw in the squid pieces.
      4. Stir regularly and again, season to taste with the lemon  juice, salt & pepper.
      5. When the squid is cooked (but still nice & tender) add the chorizo back into the pan for 30 seconds to warm through.
      6. To serve, divide the squid & chorizo into two portions, placing in the centre of each plate.
      7. Place the tomatoes randomly around the outside of the plate and drizzle over the dressing.
      8. Eat as slowly as you can to maximise the enjoyment. It might also be worth trying to convince your dining partner that they don't like it that much so you can steal theirs as well. Good luck with that...

      I ate this last night for the first time and even just typing up the menu I'm drooling! That must say something about how nice it is, right?! I have to say, absolutely delicious...

      Serves 2

      Tuesday, 25 June 2013

      pork belly with black pudding, scallops, fondant potatoes, oyster mushrooms and wild garlic


      With the starter out of the way, next up was the main course; the main event of the meal, and expectations were high. Not that I was panicking or anything of course, but I started this dish at around 10am!

      Preparation is the key here. The pork is cooked, cooled and cooked again, and there's a fair bit of last minute flying around before plating up, but thankfully the end result tastes like a little bit of heaven. I love all of these ingredients, and together they're just perfect. Loads of different flavours, half a dozen different textures, and a real showcase of a meal to impress even the in-law-est of in-laws!

      Enjoy making this; you'll get a real sense of achievement as a cook and what you end up eating is guaranteed to be one of the nicest meals you've produced all year!


      Ingredients

      For the pork belly
      • 1kg - 1.3kg pork belly, bones/ribs removed. skin scored
      • Handful of fresh thyme sprigs
      • 2 bulbs garlic, halved horizontally
      • 350ml white wine
      • 500ml warm chicken stock
      • Olive oil
      • Sea salt
      • Freshly ground black pepper

      For the fondant potatoes
      • 3-4 large potatoes, peeled & cut into 4cm cubes (2 cubes per person)
      • 150g butter
      • 75ml chicken stock
      • 2 sprigs fresh thyme
      • 2 garlic cloves, crushed/broken slightly with a knife
      • Sea salt
      • Freshly ground black pepper

      For the rest!
      • 8 slices black pudding
      • 8 scallops, cleaned & patted dry
      • Good handful of oyster mushrooms
      • 2 tbsp butter, diced
      • Olive oil
      • Good handful of wild garlic
      • Sea salt
      • Freshly ground black pepper


      Method
      1. For the first stage of the pork belly, preheat the oven to 180c / 160c (fan) / gas mark 4.
      2. Season the pork with salt & pepper on both sides and rub with a couple of good glugs of olive oil.
      3. Place the garlic in a roasting pan, cut side up, and cover with the sprigs of thyme. Place the pork belly on top, skin side up, and pour around 250ml of the wine around the edges into the pan.
      4. Cover loosely with tin foil, cook the pork for 2 hours before resting on a board for 10-15 minutes.
      5. Place the pork in a clean tray or dish, with another on top. Weight it down (cans of food are good for this) and leave to cool for around 3-4 hours.
      6. The gravy comes next! Place the original roasting tin on the stove top over a medium-high heat and deglaze with the remaining 100ml of wine. Reduce for 3-4 minutes then add the stock and reduce again by half, making sure you break the garlic & thyme down as much as possible with a wooden spoon to get all the flavour out.
      7. Sieve the sauce into a jug and set to one side for reheating later when plating up.
      8. When the pork is cooled (and a lot flatter), divide it into 8 equal portions and get the oven up to its highest setting (around 220c). When the oven is nice & hot, cook the pork skin side up on the top shelf until the skin crisps up (around 15 minutes or so).
      9. In the meantime, you can deal with the fondant potatoes. Put the butter into a saucepan & heat until foaming. Place the potatoes in and cook for around 5 minutes, until they start to turn a nice golden brown. Turn over and cook for another 5 minutes before adding the stock, garlic and thyme sprigs. Cover & reduce the heat slightly, and simmer for another 5 minutes or so, until the potatoes are tender.
      10. For the mushrooms, just fry in some olive oil with a little black pepper until cooked through & tender.
      11. Next up is the black pudding. Heat a little olive oil in a non-stick pan, add the black pudding and fry for 2 minutes on each side until crispy. Remove from the pan & place to one side on a warm plate.
      12. Season the scallops lightly with salt & pepper. In the same pan as you cooked the black pudding, add a little more oil and when nice & hot add the scallops and cook for 30s-60s on each side. The time will depend on the size of your scallops, but you're looking for a nice brown sear before turning.
      13. Finally, sauté the wild garlic in a knob of butter until nicely wilted. You should also reheat your sauce at this stage - in a microwave will do, especially as you probably don't have any clean pans left by now!
      14. To serve, place two pieces of pork belly on each plate, then two pieces of black pudding with a scallop on each, and two potatoes with a couple of the mushrooms on top. Place your wild garlic in the middle of the plate & pour the sauce into the gaps in between it all!
      15. This is a fair bit of faffing around; I do understand that, but trust me, it's very much worth every second!
      The dish is lovely served with pretty much any wine too! Red is great with the pork and black pudding, white is great with the potatoes, pork, scallops & black pudding, and rose is great with everything!

      Enjoy!

      Serves 4

      Tuesday, 18 June 2013

      pan fried sea bass with carrots, leeks & caper butter sauce


      The outlaws were heading into town.

      Wait, let me start that again...

      My girlfriend's lovely parents were coming round for dinner.

      Unfortunately for me, my cooking has been bigged up somewhat by my loved one (and admittedly, also by me), so I had quite a lot to live up to. As you know, I always try to come up with dishes that have the look, feel & taste of restaurant standard plates of food, but which don't break the bank, so this was my chance to go with that & give la familia something very special without having to use any ingredients that rhyme with 'mobster'.

      Vegetables are always a good option. They're cheap, versatile, tasty, and good for us! So they were on the shopping list without a second thought. The nice people over at Kish Fish in Smithfield had also just sent me a text message informing me that sea bass fillets were on offer, so that also seemed like a no-brainer - who doesn't like fresh, simply-cooked fish, right?! And as we know, many people have the notion that fish is ridiculously difficult to cook - when in fact it's one of the simplest (shhh don't tell anyone!), so always a good one when trying to impress an Irish Mammy...

      Then I just needed a sauce. Butter sauces are light, so great with fish dishes like this. The lemon is lovely with the bass, and the capers add a nice bit of zing against the sweet vegetables.

      Try this dish out, and if you can't get hold of sea bass, go for whatever fish you can - trout, salmon, mackerel etc; they all work just as well.

      Suffice to say, The Parents were suitably impressed, and loved the food. Phew! Ah but then there was the main course...

      Enjoy!


      Ingredients
      • 4 fillets sea bass, cut into 2 or 3 pieces each
      • 4 medium carrots, peeled & cut into matchsticks
      • 1 large leek (or 2 medium), cleaned & cut into matchsticks
      • Juice of ½ lemon
      • 150g butter, diced
      • 2 tsp capers, drained
      • 2 tbsp vegetable oil
      • Small handful of samphire, to serve (optional)


      Method
      1. Heat a large sauté pan (or deep frying pan) over a medium-high heat, add 100g of the butter and throw in the leeks & carrots. Sauté for 5 minutes or so, until starting to soften. Lower the heat to keep warm & soften a little more, whilst you cook the fish.
      2. Heat a separate non-stick frying pan until hot. Season the fish lightly on the flesh side with a little salt (not much), and add the oil to the pan.
      3. Carefully place the fish in the pan, skin side down, being careful not to splash yourself with the hot oil (lay the fish away from you to prevent this).
      4. Press the fillets down for a few seconds if necessary to stop them curling up and stay nice & flat - this helps give you a lovely crisp skin. If you're having the samphire, blanch this in boiling water now for around a minute or so until softened, then drain and put to one side.
      5. When the skin has coloured and crisped up, turn the fish and cook for another minute or so on the flesh side, until cooked through. Remove and place on a warm plate.
      6. In the same pan as you cooked the fish, add the remaining 50g of butter and add the capers. When the butter has melted, squeeze in the lemon juice and mix together gently to ensure all the capers have taken on the flavours.
      7. To serve, spoon the carrot & leek mixture onto a plate and place the sea bass on top before spooning over the caper butter.
      8. Finally, to finish off the samphire, just throw it into the remainders of the caper butter and stir around for a few seconds until warmed through. Place on top of the plate, and of course, don't forget to arrange pretentiously!
      This is lovely with a nice big glass of cold, dry white wine - which is also useful for drowning your sorrows once you start wishing you'd have made more!

      Serves 4

      Tuesday, 30 April 2013

      chicken liver pâté

      Chicken liver pâté

      Simple, cheap as chips (cheaper than chips actually!), and one of tastiest things you'll ever cook! That's just how I'd describe this recipe for my chicken liver pâté. No more to be said really, just get cracking, grab some crusty bread, and see if you can stop eating it once you start!


      Ingredients
      • 1 tbsp olive oil
      • 150g bacon lardons
      • ½ onion, finely chopped
      • 2 sprigs thyme, leaves only
      • 2 cloves garlic, finely chopped
      • 500g chicken livers
      • 3 bay leaves
      • 1 shot glass brandy (optional but also very necessary!) 
      • 120g softened butter, cubed

      For the topping:
      • 110g clarified butter
      • 6 small sprigs of thyme


      Method
      1. Heat the oil in a large frying pan and cook the bacon, onion, thyme and garlic until the onions have softened and the bacon is cooked (don't colour it).
      2. Add the chicken livers and bay leaves. Turn the heat up a little & cook for about 4 minutes, until the liver is browned on the outside but still soft/pink in the middle.
      3. Pour in the brandy, light it & let it burn off (stand back), then simmer for around 3 minutes.
      4. Take off the heat, take the bay leaves out and leave to stand for a couple of minutes.
      5. Spoon into a food processor and pulse a few times to get a rough pâté look. Add the butter a little at a time and blitz in each time, until it's all well mixed & the pâté is smooth-ish (or to whatever consistency you prefer). Season with salt & pepper if needed (probably won't be, especially if the bacon was smoked).
      6. Divide the mixture between six ramekins/pots/cups/whatever. Allow to cool for a few minutes and stick in the fridge for a couple of hours.
      7. Clarify the butter but placing in a small saucepan over a medium heat until the solids separate (the white stuff). Sieve off through a fine sieve and keep the golden (clarified) liquid butter.
      8. Take the pâté out of the fridge, sit a little sprig of fresh thyme on top of each and cover the pate with a layer of clarified butter. Stick back in the fridge for another 3 or 4 hours.
      9. Eat. Get fat. Don't really worry about that. Eat a bit more.
       

      Sunday, 21 April 2013

      spaghetti with crab, lemon & chilli

      Spaghetti with crab, lemon & chilli

      We're all so busy these days, have you noticed? Too busy to call, too busy to relax, and certainly too busy to cook a meal. Thank The Lord that this dish only takes 10 minutes then!

      Simple, tasty, healthy (and my god, moreish), this pasta meal only uses pasta & just a handful of other ingredients, plus the obligatory olive oil of course! Have it for supper, or pile it up as a main course; either way you'll make it again & again!


      Ingredients
      • 300g white crab meat
      • Large handful of freshly chopped parsley
      • 1 red chilli, de-seeded & finely chopped
      • Zest & juice of 1 lemon
      • Large clove of garlic, finely sliced
      • 200g spaghetti
      • 3 tbsp olive oil

      Method

      1. Cook the pasta in plenty of boiling salted water until al dente (around 8 minutes) and drain.
      2. Meanwhile, heat 1 tbsp of the oil in a large frying pan (or sauté pan). Add the crab, parsley, chilli, garlic & lemon zest, and fry gently for a couple of minutes, stirring constantly to mix together & warm through.
      3. Add the remainder of the oil and the lemon juice and cook for a further 2 minutes.
      4. Add the pasta & mix well until coated with the crab sauce.
      5. Serve, eat, say yum a few times...

      Serves 2

      Thursday, 11 April 2013

      seared tuna with tuna tartare, scallops and pak choi salad

      Seared tuna with tuna tartare, scallops and pak choi salad

      When we talk about cooking with tuna, many of us think of the tinned stuff, in oil, or water, or (more trendy) olive oil. Now, that type of tuna is pretty cool in its own right of course; it's cheap, it's versatile, and it makes a great addition to a salad, stirred into a tomato pasta sauce, or just mixed with some mayonnaise and thrown on toast with tomato & cheese for a quick & comforting classic tuna melt.

      For dinner however, the fresh option will give you a whole different experience. Full of essential nutrients, fresh tuna really is something else! The texture is just amazing (the fresher the better), and can even be eaten raw (think sashimi), and the fish lends itself brilliantly well to Asian flavours.

      Price-wise, it clearly costs more than the tinned variety, but is worth every penny, and really won't break the bank - and why should it?! A little goes a long way, and I've designed this recipe to show off a couple of ways to make the most of tuna and its beautiful qualities. As a light lunch or a swanky starter, it's all good. Enjoy!


      Ingredients

      For the seared tuna
      • 1 piece of fresh tuna (around 350g is plenty for 4 people)
      • 1 tbsp soy sauce
      • 1 tbsp clear honey
      • 1 tbsp toasted sesame oil
      • 2 tbsp sesame seeds

      For the tuna tartare
      • 150g fresh tuna, diced into very small pieces (the smaller the better)
      • 1 tbsp soy sauce
      • 1 tbsp sesame oil
      • 1 tbsp clear honey
      • ½ lime, juice only
      • 1 spring onion, finely chopped
      • ½ green chilli, finely chopped
      • Salt & freshly ground black pepper

      For the scallops
      • 8 scallops, corals removed
      • 1 tbsp olive oil

      For the pak choi salad
      • 2 pak choi, cleaned and thinly sliced
      • ½ lime, juice only
      • Small handful of fresh coriander, roughly chopped
      • 2 tbsp extra virgin olive oil
      • ½ green chilli, finely chopped
      • Handful of beansprouts
      • 3 or 4 radishes, very finely sliced
      • 2 cloves of garlic, finely chopped
      • 1 tbsp wholegrain mustard
      • 1 tbsp clear honey


      Method
      1. First make the marinade for the tuna. Whisk the soy sauce, honey & sesame oil together in a bowl and place the tuna in, ensuring it gets a good coating. Leave for at least 5 minutes to soak up the flavours.
      2. Next make the dressing for the salad. Mix everything together apart from the pak choi (reserve a small amount of coriander for garnish). Set to one side.
      3. For the tuna tartare, mix all the ingredients together, seasoning to taste.
      4. To finish the seared tuna, remove from the marinade and coat in the sesame seeds. Heat a griddle pan (or non-stick frying pan) until hot, add a small amount of olive oil and carefully place the tuna in the pan. Sear on all sides and remove to rest for a couple of minutes. The whole cooking process there should only take around 2-3 minutes in total, and don't panic of some of the seeds  burn a little; they just add to the flavour & textures!
      5. For the scallops, season lightly with salt & freshly ground black pepper. Heat the oil in a frying pan until hot and cook the scallops for 30 - 60 seconds on each side, until they colour & start to caramelise slightly.
      6. Finish the salad by adding the pak choi to the dressing, making sure everything gets a good coating.
      7. To serve, place a small pile of salad on a plate. Next, slice the tuna into pieces no more than 1cm thick and place on top of the salad. Put 2 good spoonfuls of the tuna tartare on the plate and place a scallop on top of each. Finally, spoon over a little of the salad dressing and sprinkle over some of the reserved coriander.
      8. Take photos, eat, smile, wonder how you didn't make this earlier...
      Serves 4.

      Special mention once again to the guys at Kish Fish for supplying the tuna & scallops. You rock!

      Wednesday, 3 April 2013

      monkfish wrapped in prosciutto with scallops, wilted spinach and tomato & basil sauce

      Monkfish wrapped in prosciutto with scallops, wilted spinach and tomato & basil sauce


      Easter was upon us last weekend, and that all kicked off with Good Friday. Now for me, Good Friday is a bit of a tale of two stories. On the one hand the pubs are closed and we can't get hold of a pint during a long weekend, which just seems plain unfair. On the other hand though, we can stick with tradition and eat fish! Thanks yet again to the guys at Kish Fish, and even more so actually, as monkfish was one of their weekly specials!

      Monkfish is just great; one of my definite favourites, and lovely and meaty, so it can take a good roasting, yet is still light enough to handle a strong sauce. I wrapped mine in prosciutto ham, but you can use serrano, parma ham, or even good old streaky bacon.

      Ingredients
      • 200g piece of monkfish tail
      • 3-4 slices prosciutto ham (or an alternative - see above)
      • Olive oil
      • 6 scallops, corals removed
      • Knob of butter
      • Sea salt
      • Freshly ground black pepper

      For the spinach:
      • 2 bags baby spinach
      • Olive oil

      For the sauce:
      • 1 small punnet of cherry tomatoes, halved
      • 3-4 spring onions, roughly chopped
      • 1 garlic clove, crushed
      • Half a dozen fresh basil leaves, roughly torn
      • 2 tbsp olive oil

      Method
      1. Preheat the oven to 220C (fan 200C) / 425F / gas mark 7.
      2. Carefully wrap the monkfish in the ham & season with black pepper.
      3. Heat 1 tbsp olive oil in an oven-proof frying pan until hot, add the fish and brown on all sides (around 1 minutes on each side should do it).
      4. Transfer the pan to the middle shelf of the oven and roast the fish for around 8 minutes or so, until the fish is cooked all the way through.
      5. Remove from the oven (be careful, it'll be very hot), place on a board and cover loosely with foil to rest for 5-7 minutes.
      6. While the fish is resting, make the sauce. Heat the oil in a small frying pan over a medium high heat and add the garlic & spring onion. Fry for a couple of minutes until softened.
      7. Add the cherry tomatoes and basil, and cook for around 3 minutes. The tomatoes will start to break down and go mushy.
      8. That's the sauce done & can be served as it is, but I blitzed mine with a hand blender until smooth - entirely up to you!
      9. Place the spinach & oil in a saucepan over a medium heat, place the lid on the pan and cook until wilted down, stirring every 30 seconds or so. Drain through a sieve or colander.
      10. For the scallops, add 1 tbsp olive oil to a small frying pan along with a knob of butter, and heat until hot (but not smoking). Season your scallops with a little salt & freshly ground black pepper and add to the pan. Cook for 30 - 60 seconds, until they start to brown & caramelise, then turn and cook for the same time on the other side.
      11. To serve, place the spinach in a neat pile in the centre of the plate, lay slices of the monkfish on top and drizzle a little sauce over. Put 3 more small dollops of sauce around the plate and sit the scallops on top.
      12. Eat, smile, tell all your friends...
      Serves 2.

      Monday, 25 March 2013

      prawn & asparagus risotto with seared scallops

      Prawn & asparagus risotto with seared scallops

      I think we all feel a bit on the glum side at the moment, stuck in the midst of this ridiculous weather. Wet & windy is not what we want! It is, however, what we've got, so this weekend I went down the comfort food route, and made Ms Chefilepsy & I a risotto. Quick, simple, hearty, and tasty enough to take your mind off what's outside, just for a little while at least.

      I got hold of some lovely peeled fresh prawns from the guys at Kish Fish on Saturday morning (as well as half a dozen scallops, but then I just can't resist scallops!), and had some asparagus kicking about, so that decided what was going in the dish for me! You can stick in pretty much anything you want; the basic risotto is usually the same each time, with your main ingredient of choice just being stirred in towards the end.

      Ingredients
      • 200g peeled prawns (cooked or raw - I used raw)
      • 350g risotto rice, such as Arborio or Vialone Nano
      • 2 shallots, finely chopped
      • 1 glass dry white wine
      • 2 litres warm chicken or vegetable stock (I went for a 50/50 split)
      • 20 asparagus spears, blanched in boiling slated water for 4 minutes, drained & cut into 
      • 12 scallops, corals removed (optional)
      • Sea salt
      • Freshly ground black pepper
      • A few knobs of butter
      • Handful of freshly chopped flat leaf parsley

      Method
      1. Heat a large saute pan over a medium heat and add 2 or 3 knobs of butter. Once melted, add the shallots & fry gently for 4-5 mins until softened.
      2. Add the rice and stir to coat. Cook for around 3 minutes then add the wine.
      3. Reduce down a little over 2 or 3 minutes then add the first 3 ladles of stock.
      4. Stir gently (but constantly) with a wooden spoon until you can 'draw' a line in the rice without it filling up with liquid (think of Moses parting the sea!).
      5. Keep adding the stock, a ladle or two at a time, and follow step 4 until the stock has all gone. It WILL all fit, trust me!
      6. Before you add the last ladle of stock, stir in the prawns and asparagus, until the prawns are cooked & warmed through, which should only take a couple of minutes.
      7. Season to taste with salt & pepper, take off the heat and stand with the lid on for 2-3 minutes.
      8. The risotto should be lovely and creamy, not stiff & sticky, and you should stir in a few more knobs of butter at the end to increase the richness.
      9. Finally stir in the parsley & serve, garnished with 2 or 3 additional asparagus spears and 3 scallops per serving if you have them.
      10. If you've gone for the scallops option, just season them on both ends with salt & pepper, heat some butter in a pan until melted & hot (but not burnt), and fry the scallops on each end for around 1 minute, or until seared.
      Serves 4.

      Wednesday, 20 March 2013

      crab salad with fresh herbs & cucumber

      Crab salad with fresh herbs & cucumber

      This salad makes a good sized starter or a lovely light lunch, and is packed with flavour thanks to the combination of freshly chopped herbs. Use fresh crab meat if you can (although tinned will do just fine too!).


      Ingredients (for 2 people)
      • 300g white crab meat
      • Handful of fresh chives, chopped
      • Handful of fresh mint, finely chopped
      • Handful of fresh basil, finely chopped
      • Handful of fresh coriander, finely chopped
      • 1 clove of garlic, crushed
      • Zest & juice of 1 lime
      • Pinch of ground white pepper
      • 3 tbsp mayonnaise
      • Olive oil
      • ¼ cucumber, very thinly sliced

      Method
      1. Place all the ingredients (except the cucumber) into a bowl and mix gently with a fork.
      2. To serve, layer the crab mixture between 2 layers of the cucumber - use a cooking ring/mould if you want to go for a bit of swanky presentation.
      3. Finish with a chive or two on top of each stack and scatter chopped chives around for an even more impressive looking plate!
      4. Enjoy with a nice glass of chilled dry white wine. Or maybe two. Or...

      Saturday, 2 March 2013

      baked cheesecake with raspberry compote


      Baked cheesecake with raspberry compote

      Talk about a simple recipe! This dessert is baked in the oven rather than just chilled in the fridge, so more of a New York/American style. But yep, tasty nonetheless! It isn't as sweet as a typical cheesecake so needs the extra kick & sweetness of the fresh berries I think. Preparation only takes around 5 minutes, and then just whack it in the oven to do it's thing. And the raspberry compote only takes 5 minutes too. I said it was easy didn't I?!


      Ingredients
      • 800g cream cheese (Philadelphia or similar)
      • 200ml double cream, whisked until it thickens slightly & turns glossy
      • 3 eggs
      • 25g caster sugar
      • 1 tsp vanilla extract
      • 300g fresh raspberries
      • 1 tbsp icing sugar

      Method
      1. Preheat the oven to 190C (fan 170C) / 375F / gas mark 5
      2. Lightly grease a 23cm springform cake tin with butter or oil.
      3. Whisk the cream cheese until fluffy, then add the cream, eggs, caster sugar and vanilla extract, and mix in until well combined.
      4. Pour into the cake tin & place in the middle of the oven for around 40 minutes, until the cheesecake starts to colour on top. It may also crack a little but that's completely normal!
      5. Allow to cool completely in the tin (it will firm up a little and make slicing much easier).
      6. For the compote, just place the raspberries in a small pan with the icing sugar and heat up over a medium heat, stirring occasionally. The raspberries will soften & start to turn mushy - that's when they're done!
      7. To serve, place a slice of cheesecake on a plate and drizzle the warm compote on & around, before getting stuck in.
      Serves 10-12.

      Wednesday, 27 February 2013

      squid with lemon & chilli

      Grilled squid with lemon & chilli


      This is a recipe I picked up when I was living in Spain and ticks all the boxes: It's fresh, it's cheap, it's healthy, and above all, it's tasty! And it smells fantastic when you're cooking it! Squid is low in calories and is high in nutrients such as Vitamin A, potassium and calcium. And at around only €8/kilo, it makes for an incredibly economical ingredient. So don't be scared by fresh squid, and give this a go. It's a much nicer alternative to deep fried, battered (rubbery) squid rings!


      Ingredients
      • 4 fresh squid, cleaned & prepared*
      • 1 red onion, sliced
      • 2 red chillis, de-seeded & sliced very thinly
      • 500g new potatoes
      • 2 cloves garlic, chopped
      • Juice of 2 lemons
      • Large handful of fresh mint, chopped
      • Large handful of fresh flat leaf parsley, chopped
      • Olive oil
      • 4 knobs of butter
      • Sea salt
      • Freshly ground black pepper

      *To prepare my squid, I usually put slices though it, but be careful not to go all the way across. To do this safely, just lay a large knife inside the squid, and slice across with a second knife, then repeat on the other side. The knife inside the squid will act as a barrier to stop you cutting all the way through and ending up with squid rings! This technique is great for getting all the other flavours into the squid, and looks professional too!


      Method
      1. Place the potatoes in boiling salted water & cook for around 8 minutes, until starting to get soft. Drain and leave to dry in their own steam in the colander.
      2. When the potatoes have cooled slightly, heat 2 tbsp olive oil and 2 knobs of butter over a medium high heat in a large heavy frying pan, and add the potatoes, crushing down slightly with a wooden spoon or a masher.
      3. When the potatoes are starting to colour nicely, make space in the pan and add a drop more olive oil, along with the red onion.
      4. Cook until soft, then remove the potato & onion mixture and keep to one side in a warm dish.
      5. Add a little glug of olive oil to the pan. Season the squid lightly on both sides and fry for around 2 minutes on each side; you should see the squid starting to lose it's opaque look.
      6. Add another couple of knobs of butter to the pan along with another glug of olive oil and add the chilli, garlic and parsley. Toss around so all the flavours get into the squid. Pour over half the lemon juice, a little more seasoning to taste, and toss again to make sure everything gets a good coating.
      7. Put the potatoes & onion back in the pan and again, toss around to make sure everything picks up the flavours of everything else.
      8. To serve, place the potatoes on a large platter and lay the squid on top.
      9. Finally, squeeze over the rest of the lemon juice and sprinkle with the fresh mint.
      Serves 4.

      Thursday, 21 February 2013

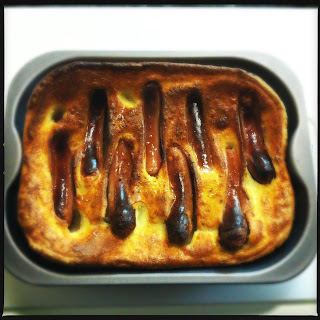
      toad in the hole

      Toad in the hole

      Toad in the hole is that British classic that everyone seems to like, and thankfully it's really quick (& really simple) to make, and with very few ingredients. Personally I can eat toad in the hole any time of the night or day to be honest; whether it's brunch, lunch, dinner or supper (and on occasion, breakfast, but that's a whole other story). This is comfort food at its best...


      Ingredients
      • 8 pork sausages (ideally Lincolnshire)
      • 125g / 4½ oz plain flour
      • 150ml / 5fl oz milk mixed with 150ml / 5fl oz water
      • 2 fresh free-range eggs
      • 1-2 tbps wholegrain mustard
      • Salt
      • Freshly ground black pepper
      • 2-3 tbsp oil (or ideally lard)

      Method
      1. Pre-heat the oven to 220C (fan 200C) / 425F / gas mark 7
      2. Put the oil (or lard) into a roasting tin and place in the oven to heat up.
      3. For the batter, whisk together the flour, milk & water, eggs, mustard, salt & pepper until smooth and aerated, with no lumps. Leave to rest for 10-15 minutes
      4. When the fat is smoking, carefully pour in the batter mixture (stand back, it may spit), then arrange the sausages in the batter with an even space around each one.
      5. Place the tin back in the oven  and cook for 25 - 30 minutes, or until the Yorkshire pudding has risen well and the sausages look cooked through (NOTE: Don't keep opening the oven door to check the progress as this will cause the oven to cool down and your pudding won't rise).
      6. Serve with around half a ton of mash & 2 or 3 gallons of onion gravy :o)
      Serves 4.

      Tuesday, 19 February 2013

      lamb with mediterranean vegetables

      Lamb with Mediterranean Vegetables

      Spring has finally sprung, or is at least starting to have a bit more of a boing about it, and what better food to get stuck into than lovely lamb?

      The temperature out there still isn't up to our normal tropical Irish summer levels just yet though, so this dish offers a great combination of in-season meat with some warming, and ever-hopeful summer type vegetables from the Med, all cooked together in the oven to warm the belly and keep the comfort food cravings well in check.

      If you don't have all of the vegetables listed, no problem! Just use whatever you have in. In the past I've done this using asparagus, green beans, carrots, red onions, butternut squash...


      Ingredients
      • 4 lamb chops or cutlets
      • 3 cloves garlic
      • 3 tbsp olive oil
      • 2 tbsp fresh rosemary leaves
      • 2 tbsp fresh mint leaves
      • 1 aubergine, sliced into 1cm thick slices
      • 2 courgettes, sliced into 1cm thick slices
      • 1 red pepper, cut into large pieces
      • 1 yellow pepper, cut into large pieces
      • 1 red onion, peeled & cut into large pieces
      • 200g cherry tomatoes, halved
      • 50g feta cheese
      • Salt
      • Freshly ground black pepper

      Method
      1. Pre-heat the oven to 180C (fan 160C) / 350F / gas mark 4
      2. Place the rosemary, mint & garlic into a pestle & mortar and pound until they're all mixed up to a fairly smooth consistency (not too smooth though - we like chunks!). Add the olive oil and mix together. Smear the mixture over the main 'eye' of the lamb chops & set to one side.
      3. Lightly oil a large baking dish and add in the aubergine, courgette, peppers and red onion.
      4. Drizzle a little olive oil over the vegetables, season with salt & pepper, and mix everything together to coat. Lay the lamb on top of the vegetables and place in the oven for 20-25 minutes.
      5. Crumble the feta cheese and dot that around the lamb, scatter the cherry tomatoes around the dish and place back in the oven for a further 10 minutes (the cheese should start to brown very slightly).
      6. Serve with fresh sliced ciabatta and a mixed leaf salad.
      7. Finish off with a glass of your favourite wine too! Being lamb, this dish will go with most red, rose or dry white wines. Easy!
      Serves 4.

      Thursday, 20 September 2012

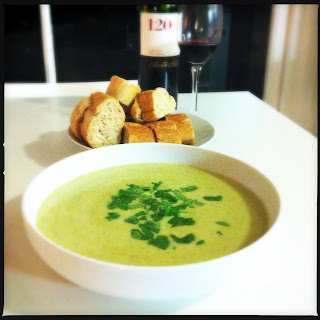
      potato, coriander & chilli soup

      Potato, Coriander & Chilli Soup

      Well, the summer is finally starting to leave us here in Ireland (most of us question if we even had one this year!), and so it's time to bring out the comfort food. Last night was decidedly nippy, so I made this lovely belly-warming soup, plonked myself firmly on the sofa and focussed on warming my cockles.

      This is a great soup for vegetarians too, and the vegans amongst you can simply replace the milk and crème fraîche with soy milk and soy sour cream respectively. The total cooking time, including chopping is around half an hour. Simple eh?! Oh and last (but not least), make sure you have a few chunks of crusty bread for dipping and mopping purposes...

      Monday, 17 September 2012

      the best malteser cake

      Malteser cake

      There comes a time in your life when you just have to go for it, and try to make the richest, sweetest, chocolateyest (is that a word? Definitely should be!) cake possible. After much searching around, and even more experimenting, I decided to go for a tried & tested recipe. Not only that, it just looked so good!!

      Lorraine Pascale is a former model and pâtissière who is rising in the TV chef world recently in the UK, and it's Lorraine's recipe I had a stab at last week.

      There's a link to the original recipe here, but I've also listed it out below for those of you too lazy to click!

      Saturday, 25 August 2012

      lamb's kidneys with mushrooms on toast


      This is my take on one of my favourite Spanish dishes 'Riñones al Jerez', or kidneys with sherry. Whilst I was living in Spain this turned out to be really versatile, in that it makes a great tapa, a substantial starter or a lovely comfort food supper.

      Ensure you get nice fresh kidneys, with all of the fat trimmed off (your butcher will do this for you). Kidneys are a really tasty piece of offal, and are cheap too - usually only around 60c each!

      Ingredients
      • 6 lambs kidneys
      • Handful of smoked bacon lardons
      • 1 garlic clove, chopped
      • 100g closed cut mushrooms, thickly sliced
      • 2 tbs sherry vinegar
      • 2 tbs olive oil
      • Juice of 1 lemon
      • Handful of fresh parsley, roughly chopped
      • 2 tbs crème fraîche
      • Salt & freshly ground black pepper, to taste

      Method
      1. To prepare the kidneys, first make sure you take off the thin membrane that covers them - you'll know if this is still on as the kidneys will look greyish in appearance - once removed you'll see them in all their lovely plummy shininess! After that, cut the kidneys lengthways, snip out the white cores with scissors (these can be quite tough to eat), and cut the kidneys in half again, giving you quarters. Place these on a plate and cover in the lemon juice to marinate a little.
      2. In a large frying pan, heat the olive oil over a medium high heat and add the bacon. After a couple of minutes add the garlic & fry for a further minute.
      3. Add the mushrooms and cook for 3-4 minutes, until they soften.
      4. Pour in the kidneys, including the lemon juice and cook for 5 minutes, stirring gently (don't kill the kidneys!).
      5. When the kidneys have started to lose their pinkness, add the sherry vinegar and again stir to combine all those lovely flavours.
      6. Throw in the parsley and and salt & black pepper to taste.
      7. After a minute or so, take off the heat a add a good dollop of crème fraîche. Stir this in to give a nice rich sauce.
      8. Serve with lovely thick slices of toasted ciabatta.
      This dish tastes lovely with a nice glass of Rioja - my favourites with kidneys are Campo Viejo or Marqués de Cáceres Reserva. Enjoy!

      Wednesday, 15 August 2012

      baked greek vegetable omelette


      Talk about versatile! You can stick anything you like into this - within reason! This is a really tasty omelette, baked in the oven instead of the traditional in-a-pan job.